
Burris C4 Plus Riflescopes
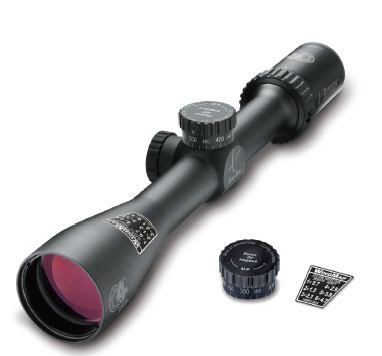
Cartridge Calibrated Custom Clicker (plus Wind Map)
Models Covered (C4 Plus line):
200328, 200329, 200337, 200469
Product Overview
The Burris C4 Plus system (Cartridge-Calibrated Custom Clicker – plus Wind Map) gives shooters the ability to match their elevation adjustment to a specific cartridge and load, making precise, repeatable long-range shots easier to achieve in the field.
The C4 Plus riflescopes were the first Burris optics designed specifically around custom elevation knobs. They launched Burris’s modern custom knob program and remain the reference platform for Burris custom elevation clickers and Wind Maps.
By combining:
- A cartridge-calibrated Custom Clicker elevation knob
- A custom Wind Map showing 10 MPH wind hold-off values in MOA at 100-yard increments
- The C4 Wind MOA reticle with MOA tick marks out to 10 MOA in each direction
the C4 Plus system allows you to range the target, dial the distance, hold for wind, and press the shot—without doing ballistic math on the fly.
Models & Item Numbers (C4 Plus)
The following item numbers are associated with the C4 Plus riflescope line and are supported for Burris custom elevation knobs and Wind Maps:
| Item # | Model | Tube | Notes |
|---|---|---|---|
| 200328 | C4 Plus 3-9x40mm, C4 Wind MOA, Matte | 1" | Part of the original C4 Plus launch; supports custom elevation knobs and Wind Maps. |
| 200329 | C4 Plus 3-9x40mm, C4 Wind MOA, Matte | 1" | Part of the original C4 Plus line; compatible with Burris custom knob services. |
| 200337 | C4 Plus 3-9x40mm, C4 Wind MOA, Matte | 30 mm | 30 mm tube version of the 3-9x40 C4 Plus; supports custom elevation knobs and Wind Maps. |
| 200469 | C4 Plus 4.5-14x42mm AO, C4 Wind MOA, Matte | 30 mm | Higher magnification C4 Plus with adjustable objective; one of the original hosts for Burris custom knob program. |
Note: This article covers operation of the C4 Plus system and applies to all C4 Plus item numbers listed above.
Key Benefits
- No more holdover guesswork: Dial your exact distance and use the center crosshair.
- Cartridge-matched elevation: Custom Clicker is calibrated to your specific load.
- Wind compensation made simple: Customized Wind Map shows 10 MPH hold-off values in MOA.
- Fast, repeatable shots: Use the C4 Wind MOA reticle’s tick marks to hold precisely for wind.
How the C4 Plus System Works
The C4 Plus Custom Clicker eliminates the need to calculate holdover. Once the distance to the target is known, you simply dial that yardage on the elevation knob. Because the scope has been calibrated to your cartridge and muzzle velocity, the center of the reticle becomes your precise aiming point at that distance.
Wind is handled using the supplied custom Wind Map and the C4 Wind MOA reticle. The Wind Map provides, for each 100-yard increment, the accurate MOA hold-off for a 10 MPH crosswind. You then translate that MOA value into reticle tick marks.
Examples:
- If your Wind Map shows 1.3 MOA at 200 yards for a 10 MPH wind, hold 1.3 tick marks into the wind.
- If the wind is roughly 20 MPH, double the value and hold 2.6 tick marks.
- If the wind is roughly 5 MPH, cut the value in half and hold 0.65 tick marks.
For optimum results, provide the most accurate ballistic and environmental information possible when ordering your Custom Clicker and Wind Map.
Installing the Custom Clicker Elevation Knob
- Sight-in first: It is best to zero your riflescope before installing the Custom Clicker.
-
Without rotating the existing elevation knob, loosen the three set screws.
- Lift the factory knob straight up and off the turret.
-
Place the Custom Clicker on the turret, aligning your sight-in yardage with the reference mark on the scope body.
-
Apply light downward pressure and evenly tighten the three set screws.
- Rotate the Custom Clicker about a half-turn counter-clockwise, then back to your sight-in distance to feel the turning resistance.
- If you want more or less resistance, loosen the screws, adjust downward pressure, retighten, and test again until satisfied.
Ordering a Custom Dial
Using the C4 Plus Riflescope in the Field
1. Dialing Elevation
- Use a quality rangefinder to determine the exact distance to your target.
- Rotate the Custom Clicker until the correct yardage lines up with the reference mark.
- Place the center of the crosshair on the target and fire—no holdover or under is needed.
2. Holding for Wind
- Estimate the wind speed and direction as accurately as possible at the target.
- Consult your custom Wind Map for the MOA hold-off corresponding to the target distance (10 MPH baseline).
- Adjust the value up or down if the wind is stronger or weaker than 10 MPH.
- Use the C4 Wind MOA reticle tick marks to hold the correct number of MOA into the wind.
Installing the Wind Map
Each Wind Map is shaped to be easily installed in several locations, such as the objective bell taper, the eyepiece, or the rifle stock.
Burris recommends placing the Wind Map on the objective bell taper, rotated approximately 10°–20° left or right of the top center depending on whether you are right- or left-handed. This position lets you view the Wind Map with your “off-eye” while looking through the scope and also offers some protection from scratches.
Installation Steps
- Determine the exact location where you want the Wind Map to sit.
- Clean the surface thoroughly with soapy water or rubbing alcohol, removing oils and dust.
- Peel the adhesive backing from the Wind Map.
- Carefully press the Wind Map into place, smoothing out any bubbles.
Eyepiece Focusing
The eyepiece is adjustable so the reticle appears sharp and black to your eyes.
- Point the riflescope at a plain background (clear sky or blank wall).
- Take a quick glance through the eyepiece. If the reticle is sharp and black, no adjustment is needed.
- If the reticle is not perfectly sharp, take repeated quick glances through the scope while rotating the focus ring until it is.
Do not stare through the scope while adjusting the focus ring—your eyes will attempt to compensate for an out-of-focus image.
Mounting the C4 Plus Riflescope
C4 Plus scopes are offered in both 1" and 30 mm main tube configurations (see the item number table above). Always confirm your tube size before selecting rings.
- Use high-quality rings and bases, such as Burris Zee or Burris Signature rings.
- Follow the torque specifications provided by the ring/base manufacturer.
- Ensure the scope is square to the action and eye relief is correct before final tightening.
Proper mounting helps maintain zero, protects the scope, and maximizes accuracy.
Care & Maintenance
The C4 Plus riflescope is fully waterproof and fogproof. With reasonable care, it will provide many years of reliable service.
Cleaning the Lenses
- Use a Lens Pen or soft brush to gently whisk away dust and debris. Keep the scope oriented so particles fall away from the lens.
- Blow across the lens surface to dislodge remaining particles.
- For heavier dirt (such as dried mud), use a spray of clean water or quality lens-cleaning fluid to fully remove contamination.
Always remove grit before final wiping to avoid scratching the lens coatings.
General Care
- All moving assemblies are permanently lubricated; no internal lubrication is required.
- Only occasional cleaning of the exterior and lenses is necessary.
- Never disassemble the scope. If service is needed, return it to Burris.
Burris Signature Warranty
The C4 Plus line is covered by the Burris Signature Warranty. Burris will repair or replace your optic if it is damaged or defective:
- No charge to you.
- No receipt required.
- Warranty is automatically transferable to future owners.
Burris optics are built by passionate hunters and shooters who demand confidence in their equipment. The Signature Warranty is your assurance that your C4 Plus riflescope will be supported for the life of the product.
Comments
0 comments
Please sign in to leave a comment.